


Clasping Hands Drawing | Step by Step Tutorial
-
Adaptive Blog / 1 year
- 5 min read
07 Jul
Individuals show their warmth towards their friends and family by holding their hands. Clasping hands is a substantial method for feeling associated with somebody. Like some other demonstrations of closeness, clasping hands delivers a chemical called oxytocin, which advances holding, association, sympathy, and trust. Clasping Hand Drawing with cool unicorn drawing or other drawing ideas like cool drawings etc live on blog.
Show of warmth has turned into a typical subject for a huge number, including drawing. Consequently, we have made a bit by bit instructional exercise on the most proficient method to draw clasping hands, summarized in 9 simple tasks and basic delineations. Ideally, with the assistance of this aide, you can draw two individuals holding every others’ hands straightaway. Have some good times and utilize your creative mind!
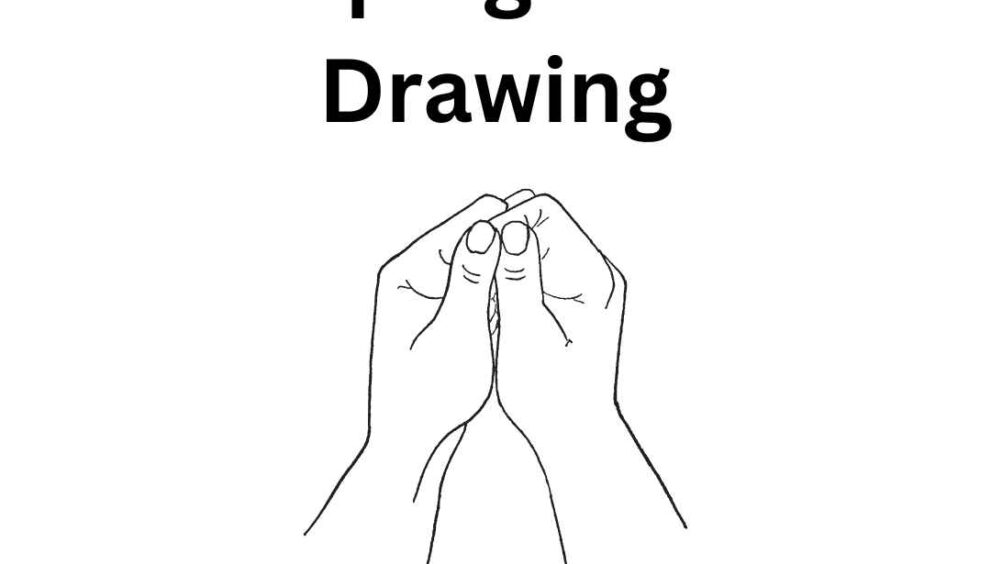
Stage 1 – Clasping hands drawing
Begin by drawing an unpredictable standing oval shape on the base piece of your paper. This structures the collapsed ring finger of the hand toward the back.
Stage 2 – Draw the Initial Two Fingers of the Hand toward the Back
Draw a comparative shape on the left half of the ring finger that we attracted the past step. This structures the collapsed center finger of the hand toward the back. Remember that the two fingers ought to be drawn next to each other, straightforwardly contacting one another. Additionally, the center finger ought to be somewhat longer than the ring finger. Subsequent to completing this step, the ring finger and the center finger of the hand in the back ought to now be finished.
Stage 3 – Next, Draw the Pinky Finger of the Hand toward the Back
Draw a more modest oval shape on the right half of the ring finger. This structures the pinky finger of the hand toward the back. Remember that the pinky finger ought to be more modest than both the center finger and ring finger.
Stage 4 – Then, at that point, Draw the Forefinger of the Hand toward the Back
Draw one more oval shape on the left half of the center finger. This structures the pointer of the hand toward the back. As of now, the file, center, ring, and pinky finger of the hand in the back is currently finished. Keep in mind, every one of the four fingers ought to be one next to the other in a somewhat corner to corner development.
Stage 5 – A short time later, Draw the Thumb of Two Hands
On the left half of your paper, draw a thumb right close to the pointer we drew beforehand. This structures the thumb of the hand toward the front. A while later, draw one more finger collapsed over the thumb that we drew quite recently. All this structures the thumb of the hand toward the back, subsequently finishing its five fingers.
Stage 6 – Attract the Three Fingers of the Hand the Front
Pushing ahead to the hand toward the front, continue by drawing its list, center, and ring finger roosted over the four fingers of the hand toward the back. When drawn accurately, it ought to seem as though the front hand is resting on the back hand, as displayed in the outline above. As of now, the clasping hands ought to now be somewhat apparent.
Stage 7 – Presently, Complete the Type of the Hand toward the Front
Define a corner to corner boundary starting from the wrist of the hand in the front the entire way to frame its pinky finger. In the wake of completing this step, the type of the hand in the front ought to now be finished.
Stage 8 – Then, Attract the Wrist of the Hand the Back
Returning to the hand toward the back, define two boundaries over the front hand. This structures the arm of the hand toward the back. Subsequently, define a bended boundary at the base to finish the construction of the hand toward the back. As may be obvious, the figure of the two clasping hands have at long last met up! Presently, all it’s missing are a fundamental subtleties to settle the drawing!
Stage 9 – Presently, Add the Nails of Each Finger of Two Hands
Draw unpredictable square shapes on each tip of each and every finger to frame the nails. Since certain fingers are shifted aside, you might have to draw a half square shape on a portion of the fingers like the thumb. Additionally, the base piece of the ring and pinky finger of the hand in the front isn’t noticeable, so you can skip drawing the nails on these fingers. That’s it — you have effectively drawn clasping hands! Presently, it’s at last time for the most astonishing part, which is shading your drawing!
The varieties you will use for the hands are completely dependent upon you! Be that as it may, here’s a tip you might see as helpful: blend the varieties white, yellow, red, and blue to make a complexion tone. Contingent upon the composition you’re attempting to accomplish, you might have to add a greater amount of any of these varieties. Have a great time playing with varieties and watch as the clasping hands at last shows some major signs of life!
Also Read Adaptive blog